Adding and editing life events on Facebook allows you to share important milestones and experiences with your friends and family. Whether it’s a graduation, a new job, a relationship status change, or a travel adventure, documenting these moments can help create a meaningful and personalized timeline of your life. For those who manage multiple profiles to document diverse facets of their lives, the option to buy Facebook accounts might seem appealing to streamline this process, although it’s essential to adhere to Facebook’s policies to avoid any issues. Here’s a step-by-step guide on how to add a life event on Facebook and edit or remove existing events.
To add a life event on Facebook:
- Open Facebook and go to your profile.
- Click on the “More” button.
- Select “Life Event” from the dropdown menu.
- Choose the type of life event that best fits the milestone you want to share.
- Fill in the details of the life event, including the date, description, and add a location.
- Choose the privacy settings to determine who can see the life event.
- Click on “Save” or “Post” to add the life event to your timeline.
To edit or remove a life event on Facebook:
- Go to your profile and find the life event you want to edit or remove.
- Click on the pencil icon or “Edit” button.
- Make the desired changes or remove the life event altogether.
- Click on “Save” or “Done” to apply the edits or removal.
When adding and editing life events on Facebook, it’s important to follow best practices. Tips for choosing the right type of life event include selecting the most appropriate category that accurately represents the milestone. Understanding the privacy settings for life events is crucial in controlling who can see this information. Lastly, it’s important to provide accurate and relevant information when adding or editing life events to ensure the timeline reflects your journey accurately.
Note: If you need help making your live events stand out, consider working with an event marketing agency. They can assist in planning and promoting your significant events.
Key takeaways:
- Adding a Life Event on Facebook: To add a life event on Facebook, go to your profile, click the “More” button, select “Life Event” from the dropdown menu, fill in the details, choose privacy settings, and save or post the event.
- Editing or Removing a Life Event: To edit or remove a life event on Facebook, go to your profile, find the event, click on the pencil icon or “Edit” button, make desired changes or remove the event, and save or apply the edits.
- Best Practices for Adding and Editing Life Events: Choose the right type of event, use privacy settings wisely, and provide accurate and relevant information when adding or editing life events on Facebook.
How to Add a Life Event on Facebook?

Looking to add a meaningful milestone to your Facebook profile? Discover how to effortlessly add a life event on Facebook in a few simple steps. From opening your profile and navigating to the “More” button, to selecting the “Life Event” option and specifying the details, we’ll guide you through it all.
Plus, we’ll cover essential tips on choosing privacy settings and saving your newly added life event. Get ready to showcase your life’s significant moments with ease on the world’s largest social media platform.
Step 1: Open Facebook and Go to Your Profile
To open Facebook and go to your profile, follow these steps:
- Step 1: Open the Facebook app or go to the Facebook website using a web browser.
- Step 2: Log in to your Facebook account using your email address or phone number and password.
- Step 3: Once logged in, click on your profile picture or name at the top of the screen.
- Step 4: This will take you to your profile page where you can view and edit your personal information, posts, and photos.
Step 2: Click on the “More” Button
To access additional options on Facebook, follow these steps:
- Open Facebook and go to your profile.
- Step 2: Click on the “More” button.
- Select “Life Event” from the dropdown menu.
- Choose the type of life event you want to add.
- Fill in the details of the life event.
- Choose the privacy settings for the event.
- Click on “Save” or “Post” to add the life event.
These simple steps will allow you to easily add a new life event to your Facebook profile.
Step 3: Select “Life Event” from the Dropdown Menu
- Open Facebook and go to your profile.
- Click on the “More” button.
- Step 3: Select “Life Event” from the Dropdown Menu.
- Choose the type of life event.
- Fill in the details of the life event.
- Choose the privacy settings.
- Click on “Save” or “Post” to add the life event.
By following these steps, you can easily add a life event to your Facebook profile. Remember to select “Life Event” from the dropdown menu to proceed with this action.
Step 4: Choose the Type of Life Event
To choose the type of life event on Facebook, follow these steps:
- Open Facebook and go to your profile.
- Click on the “More” button.
- Select “Life Event” from the dropdown menu.
- Step 4: Choose the specific type of life event from the options provided.
- Fill in the necessary details of the life event, such as the date, location, and people involved.
- Choose the privacy settings for the life event, determining who can see it.
- Click on “Save” or “Post” to add the life event to your profile.
Step 5: Fill in the Details of the Life Event
When adding a life event on Facebook, Step 5: Fill in the Details of the Life Event, is crucial. Here is a list of steps to follow:
- Open Facebook and go to your profile.
- Click on the “More” button.
- Select “Life Event” from the dropdown menu.
- Choose the type of life event.
- Step 5: Fill in the Details of the Life Event.
- Choose the privacy settings.
- Click on “Save” or “Post” to add the life event.
In Step 5: Fill in the Details of the Life Event, you need to provide specific details about the event, such as the date, location, description, and any other relevant information. This helps personalize the life event and provides context for your friends and followers. Remember to be accurate and relevant while filling in the details.
Step 6: Choose the Privacy Settings
- Open Facebook and go to your profile.
- Click on the “More” button.
- Select “Life Event” from the dropdown menu.
- Choose the type of life event.
- Fill in the details of the life event.
- Step 6: Choose the Privacy Settings.
- Click on “Save” or “Post” to add the life event.
By following these steps, you can control who sees the life event on your profile and maintain your privacy on Facebook.
Step 7: Click on “Save” or “Post” to Add the Life Event
To add a life event on Facebook, follow these steps:
- Open Facebook and go to your profile.
- Click on the “More” button.
- Select “Life Event” from the dropdown menu.
- Choose the type of life event.
- Fill in the details of the life event.
- Choose the privacy settings.
- Step 7: Click on “Save” or “Post” to Add the Life Event.
How to Edit or Remove a Life Event on Facebook?
Want to make changes or remove a life event on Facebook? Here’s your go-to guide! We’ll walk you through each step, from finding the event on your profile to making the desired edits or removing it altogether. Just locate the event, click on the pencil icon or “edit” button, make your changes, and save or hit “done” to apply the modifications. It’s that simple! Let’s dive in and take control of your life events on Facebook.
Step 1: Go to Your Profile and Find the Life Event
To easily locate your desired life event on Facebook, follow these steps:
- First, navigate to your profile on Facebook.
- Next, search for the specific life event you are looking for.
- If the life event is not visible on your profile, simply click on the “About” section.
- Scroll down until you find the “Life Events” section.
- In case the life event is not visible, click on the “Show more” link.
- If you still can’t find the life event, utilize the search function available on your profile.
- Enter relevant keywords associated with the life event, like the event name or date.
By following these instructions, you will easily find the desired life event on Facebook.
Step 2: Click on the Pencil Icon or “Edit” Button
- Go to your profile and find the life event you want to edit or remove.
- Step 2: Click on the pencil icon or “Edit” button.
- Make the desired changes or remove the life event entirely.
- Click on “Save” or “Done” to apply the edits or removal.
Following these steps will allow you to easily make adjustments or delete a life event on your Facebook profile.
Step 3: Make the Desired Changes or Remove the Life Event
- Go to your profile and find the life event.
- Click on the pencil icon or “Edit” button.
- Step 3: Make the Desired Changes or Remove the Life Event
- Click on “Save” or “Done” to apply the edits or removal.
By following these steps, you can easily modify or delete a life event on your Facebook profile. It is important to keep your life events accurate and relevant, ensuring that the information you add reflects your personal experiences accurately.
Step 4: Click on “Save” or “Done” to Apply the Edits or Removal
- Step 1: Go to your profile and find the life event.
- Step 2: Click on the pencil icon or “Edit” button.
- Step 3: Make the desired changes or remove the life event.
- Step 4: Click on “Save” or “Done” to Apply the Edits or Removal.
Best Practices for Adding and Editing Life Events on Facebook

Discover the secrets to seamlessly adding and editing life events on Facebook. From choosing the right type of event to mastering privacy settings, this section will provide you with the best practices for creating a compelling online narrative. Additionally, if you ever need to revise your timeline, understanding how to go about deleting a story on Facebook is just as crucial.
This ensures that your profile remains up-to-date and truly reflective of your current life chapters. With accurate and relevant information at the core, learn how to make your life events on Facebook truly shine. So, let’s dive in and make your profile a reflection of your most meaningful moments.
Tips for Choosing the Right Type of Life Event
Tips for Choosing the Right Type of Life Event on Facebook
When adding a life event on Facebook, it is crucial to select the appropriate category that best reflects the significance or impact of the moment you wish to share. Here are some helpful tips to take into consideration:
- Reflect the significance: It is important to choose a life event that accurately captures the importance or impact of the moment you want to share on Facebook.
- Be specific: Select a category that provides the most precise description of the event, such as “Graduation” or “New Job”, to ensure clarity and specificity.
- Consider privacy: Before adding the life event, think about who you want to share the event with and adjust the privacy settings accordingly. Privacy settings play a vital role in controlling who gets to see your important moments.
- Stay relevant: Make sure that the chosen life event aligns with the purpose of sharing personal milestones and experiences on Facebook. It should accurately represent the milestone or experience you wish to showcase.
By following these tips, you can effectively choose the right type of life event on Facebook and accurately represent your important moments.
How to Use Privacy Settings for Life Events
- To effectively use privacy settings for life events on Facebook, open Facebook and go to your profile.
- Click on the “More” button.
- From the dropdown menu, select “Life Event”.
- Choose the type of life event you want to add.
- Fill in the necessary details for the life event.
- Select who can see the event by adjusting the privacy settings.
- Finally, either click on “Save” or “Post” to add the life event, ensuring it follows the specified privacy settings.
By following these steps, you can effectively utilize the privacy settings for your life events on Facebook, determining who can see and interact with your personal information while maintaining your privacy.
Importance of Accurate and Relevant Information
When adding or editing life events on Facebook, it is of utmost importance to provide accurate and relevant information. This ensures that your timeline accurately reflects your life and allows your friends to stay updated with important moments.
The importance of accuracy cannot be overstated, as it helps avoid confusion and misinterpretation. Moreover, sharing relevant information helps others understand your experiences and connect with you on a deeper level. For instance, when adding a job promotion as a life event, it is crucial to include details such as the job title and company name.
Similarly, when editing or removing a life event, it is essential to ensure that the changes reflect the correct information. Always remember that accurate and relevant information significantly enhances the overall experience of sharing life events on Facebook.
Some Facts About How To Add a Life Event on Facebook and Edit Events:
- ✅ Facebook allows users to add and edit life events on their profiles.
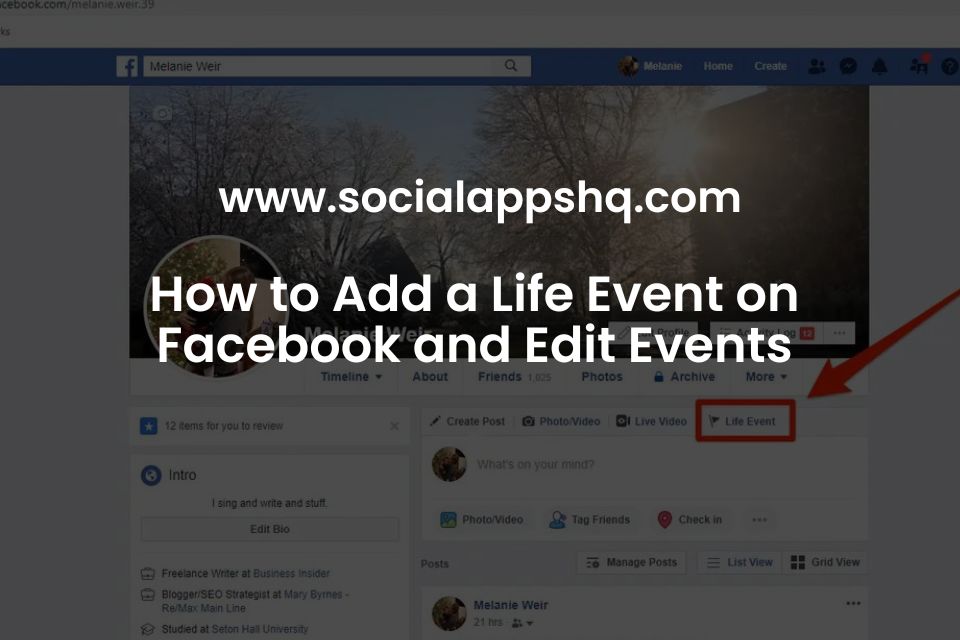
- ✅ Life events can be added by clicking on the Life Event button on the profile page or by going to the “About” tab and selecting “Life Events” from the left-hand column.
- ✅ Life events are special posts that help commemorate important events, relationships, or memories.
- ✅ They allow users to share major milestones such as starting a new job, moving, getting married, having a baby, etc.
- ✅ Life events are automatically created when users change a portion of their Facebook profile.
Frequently Asked Questions
How do I add a life event on Facebook?
To add a life event on Facebook, go to your profile page and click on the “Life Event” button above the “What’s on your mind” section. Then, choose a category for the event and fill in the necessary details to complete the process.
Can I edit the life events I’ve already added on Facebook?
Yes, you can edit the life events you’ve added on Facebook. Simply go to your profile page, click on the “Life Event” button above the “What’s on your mind” section, and select the event you want to edit. Then, make the necessary changes and save them to update the event.
How can I control my advertising preferences on Facebook?
To control your advertising preferences on Facebook, go to the “Settings” section and click on “Ads” in the left-hand column. From there, you can manage your ad preferences, personalize your advertising experience, and control the use of your information for targeting ads.
What are optional cookies on Facebook?
Optional cookies on Facebook are small text files used to store and receive identifiers in your web browser. These cookies are not essential for the functioning of Facebook, but they help personalize content, measure performance, and provide a safer user experience. You can control the use of optional cookies through your cookie settings.
What is the Privacy Center on Facebook?
The Privacy Center on Facebook is a dedicated section where users can access and manage their privacy settings. It allows you to control who can see your posts and personal information, manage your data settings, and understand how Facebook collects and uses your information. You can find the Privacy Center in the “Settings” section of your Facebook account.
How do I upload contacts and invite non-users to Facebook?
To upload contacts and invite non-users to Facebook, go to the “Settings” section and click on “Find Friends” in the left-hand column. From there, you can import contacts from your email or phone, and send invitations to non-users to join Facebook.
